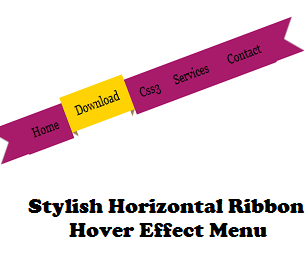
navigation bar is very important for any blog or website for easy navigation. Anavigation bar gives a blog a nice look as well as it offers the visitors to reach all the topics easily. So, I am going to tell you code to add CSS3 powered menubar in your blogger blog. Let's start:
- Go to Template > Edit HTML.
- Add a new html/javascript widget.
- Copy and paste the following code in the content box:
- Replace the # with your link and add the text topics as per your requirements.
- Save the widget and then save your layout.
- Open your blog and see the navigation bar.
<style>
.pctricksguru-ribmenu span {
background:#A81B6A;
display:inline-block;
font-family:verdana;
line-height:3em;
padding:0 1em;
margin-top:0.5em;
position:relative;
-webkit-transition: background-color 0.2s, margin-top 0.2s; /* Saf3.2+, Chrome */
-moz-transition: background-color 0.2s, margin-top 0.2s; /* FF4+ */
-ms-transition: background-color 0.2s, margin-top 0.2s; /* IE10 */
-o-transition: background-color 0.2s, margin-top 0.2s; /* Opera 10.5+ */
transition: background-color 0.2s, margin-top 0.2s;
}
.pctricksguru-ribmenu a:hover span {
background:#FFD204;
margin-top:0;
}
.pctricksguru-ribmenu span:before {
content: "";
position:absolute;
top:3em;
left:0;
border-right:0.5em solid #9B8651;
border-bottom:0.5em solid #fff;
}
.pctricksguru-ribmenu span:after {
content: "";
position:absolute;
top:3em;
right:0;
border-left:0.5em solid #9B8651;
border-bottom:0.5em solid #fff;
}
.pctricksguru-ribmenu a:link, .pctricksguru-ribmenu a:visited {
color:#000;
text-decoration:none;
float:left;
height:3.5em;
overflow:hidden;
}
.pctricksguru-ribmenu:after, .pctricksguru-ribmenu:before {
margin-top:0.5em;
content: "";
float:left;
border: 1.5em solid #A81B6A;
}
.pctricksguru-ribmenu:after {
border-right-color:transparent;
}
.pctricksguru-ribmenu:before {
border-left-color:transparent;
}
</style>
<div class='pctricksguru-ribmenu'>
<a href='#'><span>Home</span></a>
<a href='#'><span>Widget</span></a>
<a href='#'><span>Hacks</span></a>
<a href='#'><span>jQuery</span></a>
<a href='#'><span>Sitemap</span></a>
<a href='#'><span>News</span></a>
<a href='#'><span>FAQ's</span></a>
</div>


0 comments:
Post a Comment